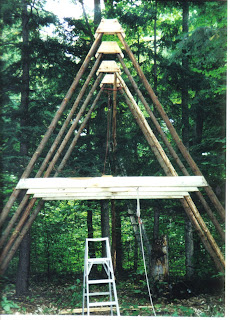
Linear Tipi shelters
These are classified as frame tents, as are yerts, Viking tents, Tipis and Wigwams, but the style I’m describing here is a bit different. I’m sure it’s not unique. But I think it's an interesting combination of the traditional Tipi with a modern A-frame. I’ll describe it and how I’ve built them for anyone interested.
1) Cut poles to uniform length, straight as possible and trim smooth. Cedar and larch are best for low weight and rot resistance, but if you can handle heavier poles, hop hornbeam (ironwood), ash, burr oak, locust or other trees used for fence posts in your area would be fine.
2) Lay two poles down on the ground in a “V” configuration with their butt ends where the shelter will begin. Pictures show 16-foot cedar poles with a base of 16 feet. Cedar doesn’t need peeling, but other woods may.
4) Attach short pre-cut cross-pieces of equal lengths at the top of the “A” to connect the tops. Pictures show my pre-built caps, but he cap device is optional: cross-pieces that extend about an inch above the top of the poles and cut to the same slope as the poles at the edges will work fine. The top cross-pieces provide a place to fasten a flat ridgeboard or pole.
 5) If you have enough open area, set up as many more “A” frame members as you want for the shelter’s length. I spaced them at 4-foot intervals for a 28-foot length. Two- and four-foot spacings are handy in case you want to add sheathing for rigidity or strength near the ground for snow accumulation in northern climates, etc. I did that later.
6) Raise the “A” upright either manually or with a pulley system or come-along attached to a tree in line with the shelter.
7) Secure this first frame member in a vertical position (ropes to trees and post holes in the ground here) and continue with the rest. Boards or poles, pre-marked at the spacing distance you’ve chosen (4-ft here) should be nailed from cross-piece to cross-piece and leg to leg each time a new frame member is added to hold everything secure.
8) Frame members also can be raised with a foundation or wall as a base. The cross-members act as collar beams to limit outward force and make the structure stable wherever it's placed. Without the collars at mid-point or lower, a wall would be forced outward. With a wall, the roof members may be shortened and the collar lowered to retain loft space.
9) Add the top ridge board or pole after you’ve made sure all is level and everything's in line.
10) Toss ropes (I use baler twine weighted with sticks for weight) over the ridge board at tarp grommet intervals, fasten to tarp and pull a tarp up. When a tarp approaches the top, push it with poles from the ground or a ladder to help it get over the ridge board without tearing. Then do the same for the other side. Make sure they are lapped. If the shelter is not as tall as this one, one tarp may cover the whole thing.  11) Here, the first of two lapped blue tarps is up. After the second was in place, both were covered by a single heavy-duty silver tarp. It's still in good shape 12 years later. Poly tarps will last many years shaded by evergreens like this. In direct sun, use canvas or paint the tarp after it weathers for about a month. I’ve painted tarps light colors and had them last four times as long as unpainted ones.
13) Now line the inside of the poles with tarp or canvas. The loft floor makes a ceiling to keep heat from rising to the peak when you need it in the winter. Blue tarp works fine here. Even when below zero outside with a wood stove for heat inside of smaller versions of this that I camp in, the inner tarp never collects condensation and is warmer to the touch than a double-pane window. As with a traditional Tipi or yert, straw, grass or fresh dry leaves can be inserted to give even more insulation.

14) This last photo is one of the smaller shelters I camp in. It's built on 4-ft walls with a 12-ft frame on top. This also has a 6-ft loft. The window is half a glass patio door mounted lengthwise in the end-wall.
Have fun!
Tally


I really like your design and it is good to know that Poly tarps will last when shaded from the sun. You have sold me on the idea of an A-frame tent or Linear Tipi as you have said. Best use of rectilinear tarps I have seen. Thanks for the instructions. God bless.
ReplyDeleteI really like your design and it is good to know that Poly tarps will last when shaded from the sun. You have sold me on the idea of an A-frame tent or Linear Tipi as you have said. Best use of rectilinear tarps I have seen. Thanks for the instructions. God bless.
ReplyDelete